How to Promote Your Old Content

So you’ve published an awesome piece of content. You’ve slaved away for hours and hours making sure that it is of value to your readers. And most of all you’ve written tons…way over 2000 words. Whey! You can’t wait to hit the publish button and watch the traffic swarm in.
Then you wait. And wait some more. But nothing seems to be happening.
You start to wonder why no one is reading your latest post. Where did you go wrong?
Soon days, weeks, and even months go by and nothing is happening. By now you have totally forgotten all about that great article and moved on to newer ones.
But then you find yourself reading through some of your old posts and you think ‘such a shame…this is really good stuff…how do I get people to read this’. You know that if you could just get some eyes on the content you would have lots of new followers.
So what do you do? How do you get people reading something you’ve written months ago?
It’s time to promote your old content.
Recently, I found myself in this very situation. It was time to re-visit some of my previous posts. In this article, I will walk you through all of the steps that I did to promote my old content – plus give you a few additional tips to go even a step further.
Free Download: Get more traffic to your website by promoting old blog posts. Download these helpful tips now.
Mapping Out Your Content
The key to promoting old content is to plan wisely. You do not want to promote everything all at once. Instead you want to have regular activity for a prolonged period of time. Therefore, you need to begin by mapping out your content.
Questions to Ask:
How many articles are you promoting?
What social media channels are you posting to?
How many days a week do you want to have activity?
How frequently do you want to post?
For how long?
Using Kudani to Promote Your Old Content
Add Your Blog to Your RSS Library
The first thing you want to do is to add your blog to your feeds library.
Enter the URL of your blog in the field at the bottom. Click search and add the feed once it has been found. The platform will begin to index your articles immediately.
Once your feed has been added all of your future articles will be automatically added as well.

Create an Amplification Template
By creating a template, you can use the same schedule and frequency for all of your posts. As this is older content you would not expect there to be a high level of traffic on a daily basis. So in trying to be as natural as possible I decided that I would post to each of the social media channels once a week for the next 26 weeks.
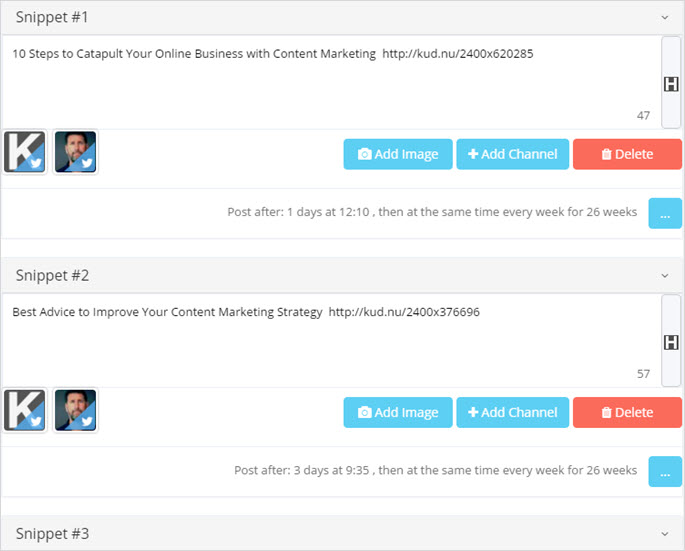
Below are two of the snippets I created. As you can see the first is scheduled to post on day one of the sequence at 12:10 to two of our Twitter channels and the second on day three at 9:35 to the same two channels. Note that I have left a day in-between posting. I would however post on day two as well, but not with my old content – instead I would post a quality article from another site. Plus, when I post new content that would need to be tweeted as well so I would want to make sure that there is a range of activity in my calendar.

Adding Snippets of Content
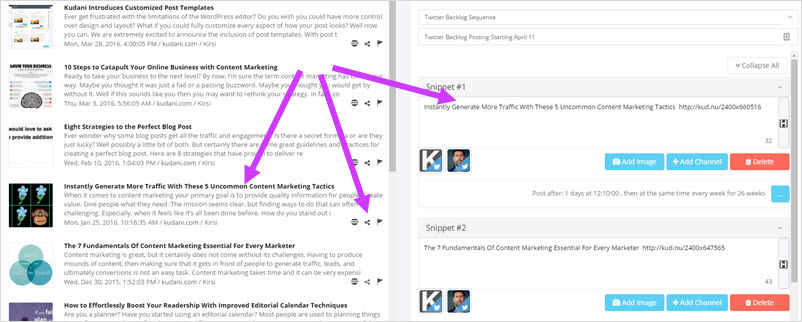
Begin by loading the feed in the center panel. This is done by simply clicking on the feed in the sidebar. Once the articles have been loaded you can add the title and short link by clicking on the share icon. Alternatively, you can highlight and copy text in the excerpt and send that to the snippet. And lastly, you can double click on the title or the thumbnail image to open the popup. Once loaded you can highlight any text from inside of the article, copy, and send directly to the snippet field.
Finally, add a title that you can easily identify. Note, the title will only be seen inside of the app. Next click on the publish button – the sequence is then activated and the articles will publish according to the schedule that you have given.

Track Posting in the Editorial Calendar
All sequences, tasks, and published posts can be seen in the editorial calendar. Once the amplification sequence is published all upcoming posts will be displayed. And when the post has actually been published a check mark will appear as a visual indicator of success.
Using the editorial calendar allows you to map out the best posting days and times and to make sure that your new content promotion schedule does not conflict or overlap with your old content schedule. By planning out the days of posting you will be able to have regular activity throughout the week without having high activity periods followed by little or no activity.
Below is my schedule for the week of April 11.

Watch the video below as I walk through all of the steps:
What’s Next?
The next, and probably most important part, is to track analytics. I want to monitor my page views, bounce rates, and overall traffic to the pages.
Google analytics allows me to get a good sense of what is going on. I am able to track all of the key metrics like visitors, page views, average duration, etc. But as well I can see behaviour, demographics, and main pages that are getting traction.
Monitor Your Website Traffic Using Google Analytics
Additional Tips
If you are seeing a significant amount of traction on one or more of your articles, consider the following:
Revive Your Old Content
Whenever reviving old content there are some things you want to consider. For example, when was the article written. As Google is looking for recency the date of the article is important, so too is this for your readers. Now while some people choose to simply change the date and time of the posting this may not always be the best option, especially if your permalink has this information. Instead add some content to the article. Keep the information fresh and relevant. If something has changed in the industry that either supports or contradicts what you have written, then say that and add the change.
Shaun Quarton, at Torque, says “an updated article can still provide great value to readers, plus it will take less time to update an article than it takes to write one from scratch—it can be a more efficient use of your time. You can then display a last modified date for your content, and you can even push it to the top of your homepage.”
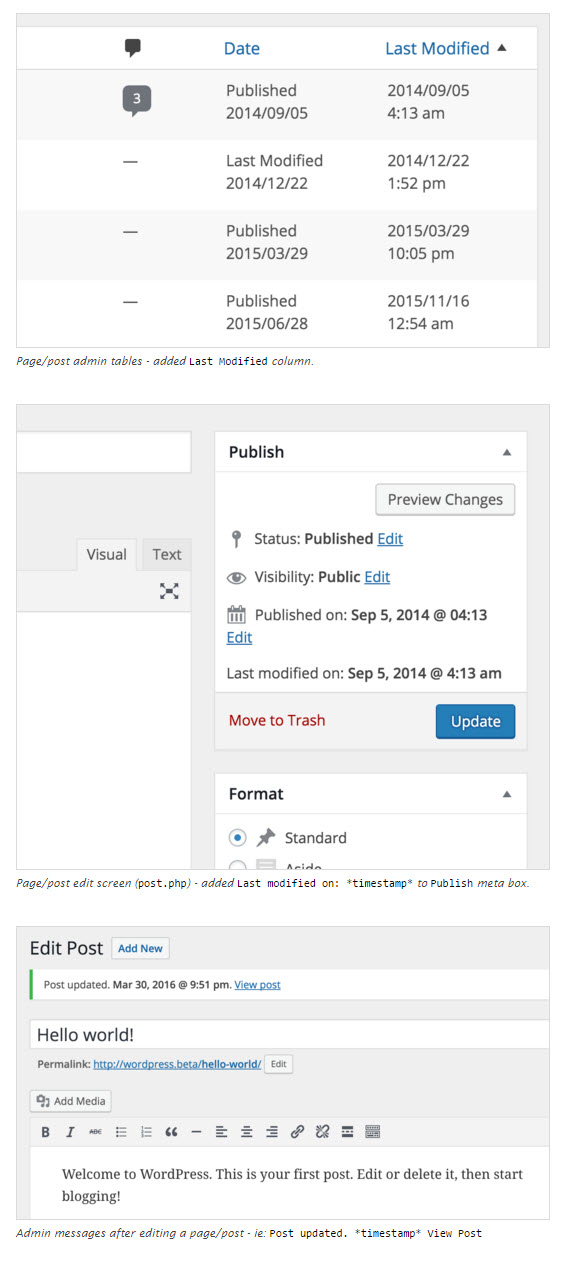
Unfortunately, WordPress does not display a last modify date by default therefore I recommend using a plugin for this. My favourite one to do this is Last Modified Timestamp.
This plugin adds information directly to the admin interface so that you can see the exact date the content was last modified.

Here’s what it looks like on the front end.

Add a Lead Magnet
There are lots of different types of lead magnets available, but by far the ones that convert the best are those that tie the offer directly to the content of the specific post.
If you’ve created quality content, then why not give a copy of your post in a PDF format to your readers. We’ve started doing this at www.kudani.com and are seeing phenomenal results.
Want to see it in action…
10 Steps to Catapult Your Online Business with Content Marketing
If you download the PDF you will see that I have styled it, created a new cover page, added a call to action, etc. all of which have taken a significant amount of time.
Wouldn’t it be great if you could just add your URL to an app and have it neatly remove all the ads and extra distractions leaving you with a perfectly formatted PDF? Well now you can. After months of development, we will soon be releasing Designrr.
Designrr is a brand new cloud based software that helps you create beautiful lead magnets and ebooks from any blog post.
Launching April 19, 2016. Get it Here.


